Tuesday, October 8, 2013

Finished Domino Pendants

 
Butterfly & Key Mini Domino Pendant
Here are some of the domino pendants I created this past weekend.  I used SU! stamps and Staz-on black ink for the images. Some of them I also edged with Holtz ink to give that antique distressed look. I wasn't sure about how the ink would hold up under the Dimensional Magic. One of the samples that I had made at the workshop turned pink and I think it was because the red ink on the paper ran, I'm not sure what happened.
I really like the mini domino, however, they are quite small and you are very limited to what will fit on your collage. Even the regular size piece is pretty small and I'm having a difficult time finding images small enough to stamp on it. This SU! set is perfect, though. Also, you could cut out images like in the last image of the "Blessed" pendant. I cut a flower out and also cut out each letter to spell out Blessed. It is very tiny cutting and those little pieces are so easy to lose. I found tweezers to be helpful. Another great tip is to find paper with small pattern designs. I tend to shop for paper with big patterns and it doesn't translate well when you are just using the corner of the sheet. You end up cutting off so much of your design. You really have to think about your "canvas" when you shop for paper. You canvas is only about an inch or less.
 
Bird on a Branch Domino Pendant
Butterfly Love Collage Pendant
Vintage Flowers Domino Pendant
Blessed Mini Domino Pendant

The last image is another mini domino. I made this for my children's' Sunday School teacher because she's moving away. We will miss her!
Please feel free to leave me a comment. Thanks!

Sunday, October 6, 2013

Domino Pendant


I am so excited about my next project! My local craft store collage offered a workshop last week Wednesday for Domino Pendants. I called on Tuesday to sign up and the class was full. I was so disappointed and upset with myself for not registering sooner. I signed up for the waiting list with low expectations; I was third on the list. What were the chances of three people cancelling the day before the class?! On Wednesday I got a voice message that the class was still full, but they were offering another one on Friday. Yay me!

I am not going to go into a detailed tutorial. I highly suggest going to the workshop. I am not very familiar with Mod Podge Dimensional. I've also never used Mod Podge before. The instructors are very knowledgeable and can answer all your questions. Plus, they have a plethora of great tips.

And for all of you that watch "Portlandia", yes, I put a bird on it.
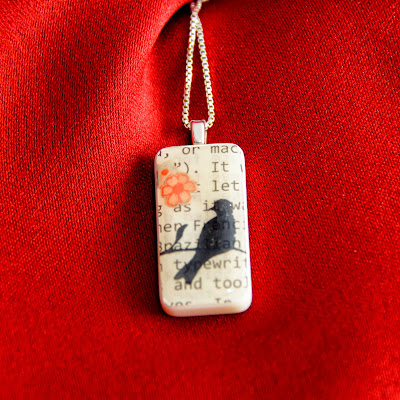
Close-up


Materials:
Domino or mini domino
Mod Podge glossy or matte
Mod Podge Dimensional Magic
E-6000 adhesive
Photo latch or pendant loop
paper for collage

 Directions:
Create a collage by gluing paper onto the domino using the Mod Podge. It doesn't matter if you use glossy or matte because you're just using it as an adhesive and not as a top coat. (The Dimensional Magic will end up being your final top coat.) When you are making your collage, be sure to really glue down all edges of your paper. If you do not do this, the Dimensional Magic will bend upward and pull away from the domino surface.
For the example shown above, I used SU! DP as the background, cut two flowers from DP (unknown) and stamped SU! bird image using Staz-on black ink.
Let it all dry thoroughly, again, to ensure that the Dimensional Magic doesn't get messed up.
Attach photo latch or pendant loop to the back of the domino using E-6000 industrial strength adhesive. E-6000 is very toxic so be sure to read the warning label before using. If you do not wish to use this, there's a non-toxic glue but I don't remember the name. Wait a bit for it to set, then you can go onto the next step.
Pour Mod Podge Dimensional Magic onto the top surface of the pendant. So, here's why I suggest you go to the workshop: if you've never used Dimensional Magic it is a bit difficult. The instructor explains that the only thing holding it up is surface tension. What does that even mean?
When you put it on, it looks cloudy, but it dries clear. Once you've got it on, you have to make sure it doesn't have any bubbles. There's a technique to that too, which I won't go into because you're going to go to the workshop, right?
You have the Dimensional Magic on, you've gotten all the bubbles out, now DO NOT TOUCH your project! You could break that "surface tension" the instructor was talking about and the Dimensional Magic will run down the side of your domino. You don't want that to happen. This is very difficult to do because you are so proud of your collage and you just want to hold it up to admire your creativity and well, it's just so darn cute. You must resist that urge! Do not fuss with or touch it! Don't even look at it. Leave it to dry for about 24 hours. (If you are OCD like me, I had to first prop the dominos up so they would lay level. You'll see what I mean when your magic dries and your surface isn't level, but if that doesn't bother you, then awesome.)
I can't wait to share the mini collages I created today. They are drying and I'm dying to touch them as we speak. You'll just have to wait with me until I can photograph them tomorrow.
Thanks for visiting!


Tuesday, August 27, 2013

Clip Board

I'm determined to stay organized this year. The thing is, I make a huge mess whenever I do anything and I like to spread out, but I always know where everything is. Good for me, not so good for my family. What better way to stay organized and better communicate with my husband than to create a message board? I piggy backed this idea I saw on Split Coast Stampers. Also, we use these at work, so why wouldn't I think to use it at home? The ones at work are just plain and ugly, though. But with a little creative touch, they become so adorable. I glued four coordinating DP to the plain clipboard ($1.99 ea.) I adhered a sticky note pad to the bottom left quadrant, added some binder clips, and added cork for push pins. Instead of buying new cork board, though, I recycled wine corks. I was able to adhere them with a hot glue gun. I added the ribbon in the center by just tying a double knot. The best thing about this is that I adhered it to the inside of my kitchen cupboard door. I used Scotch picture hanging adhesive. It's kind of like Velcro, but it's not permanent. I can hang miscellany using the large clip or smaller binder clips, and because its on the inside of the cupboard it doesn't clutter up my wall. I also use a magnet (not pictured here) on the large metal clip for even more notes. Now, I just need to add push pins to my cork board and I 'll be set.


Sunday, February 24, 2013

Glitter pink ear warmer with ivory outline accent and pearl button

Here are more head bands I've crocheted this past month. Excuse the hairy model. The teddy bear is a good stand-in. Besides, those mannequin heads creep me out.


Grape Skinny Headband.
 
Double Large + Small Flower Ear Warmer Headband
 

Sunday, February 17, 2013

Peace of My Heart


I've been making a lot of these crochet flower headbands and ear warmers for my friends and co-workers. I thought I would try to make something else. So I tried a peace sign. I made an extra wide ear warmer in purple and sewed on a crocheted turquoise peace sign. Looks hippie, but thought it looked so cute on my little model.
 
Peace of My Heart
 

Here are more crochet flowers I've made:


Chunky White Flower on Pink Ear Warmer


Soft Sage Flower with Pearl Button Accent


Soft Beige Flower with Pink Bling Button Accent

Thursday, February 14, 2013

Learning a new skill: Crochet

My M-I-L bought my daughter one of those knitting looms from the craft store a couple of months ago. They weren't able to figure it out (yes, the included directions were very confusing,) so she gave the loom to me to figure out. I'm not sure why, because at the time I didn't know how to knit or crochet. She is the one who knows how to crochet. Anyway, I was able to figure out the knitting loom and I was "hooked." Okay, that was a bad pun. But I literally became obsessed with knitting on that loom. I successfully made four scarves. I then got the courage to learn to crochet. A couple of gals at work are learning too and it just gave me incentive to give it a try.
 
The back story to this is that Grandma used to crochet and I never had an interest in it. I guess back when I was a teen, crocheting was only a "Grandma" thing to do. Then when I was in my early 30's I asked my mom to teach me. It was not fun or relaxing as advertised. Actually, it stressed me out. I couldn't get my stitches even and I kept making them too tight. Also, I hated counting stitches. My first blanket was a very uneven square. I won't post the awful photo to save all the glorious embarrassment. After the crooked blanket incident I gave up crochet....until now.
 
I have to be honest with you. Crocheting is easy, but learning to crochet is not. First of all, the patterns are in a whole other language. There is a plethora of free patterns on all over the web or even available at craft stores, but you need a decoder ring to understand them. Second of all, once you do get the language it doesn't always make sense where you add stitches. Then there's gauge. It's all very confusing. I've learned to do the four basic stitches for now. The more I practice, the easier it gets. It took me about two days to learn this flower pattern, but after doing about three I can crochet a flower in under an hour. You can get the free pattern at Protsenka. There's also Crochet Pattern Central for more free flower patterns. The earwarmer/headband I just made up myself.
So there it is. That's what I've been doing so busily for the last two months. I even crochet at work during my lunch break. I made an earwarmer for my daughter. My friends at work like them so much they've been asking me to make headbands for them too. I'm so busy I just can't keep up with the orders.
 
Steely Gray Earwarmer with Pink Accent Buttons

SF Giant Colors -  Black and Orange Headband
 
Oatmeal with Yellow Button Skinny Headband
Here's what it looks like on


Thanks for visiting! If I get up enough courage I think I'll learn to knit next.

Monday, November 19, 2012

Happy Thanksgiving

It's been so long since I lasted posted. I've been so busy and have not had any time to craft! As you know I'm starting a portrait photography business and have been occupied with that. But now that it's the rainy season I get a bit of a break. So finally this past Sunday I had a minute to do this fun crafty Thanksgiving project with my children. We had so much fun. I'm so glad we did this. We haven't laughed like that in a while.


Someone brought this snack to the church potluck. These acorns were so adorable. I also saw them on Pinterest and I knew that we could make them too. We used Hershey Kisses, Nutter Butter Bite Cookies, pretzel sticks and I melted some chocolate candy in the microwave to use as our "glue."


I didn't actually read the directions on how these are made. We started to put the kisses onto the cookie first and then realized the pretzel stem wouldn't stay on because the cookie could not lay flat. The trick is to lay the cookie down first. Add the pretzel stem with melted chocolate and let dry. Once it was secure then we added the kiss to the bottom using melted chocolate. Some of the stems didn't stay upright, but that's okay. They still tasted good. I think next time I'm going to use caramel Hershey Kisses. Caramel, chocolate, peanut butter, pretzel. How good would that taste?! Thinking about it makes me hungry for Ben & Jerry's Chubby Hubby ice cream!


I made these toppers using Bigz Dies Top Note (SU!) I cut it out and folded it in half length-wise. I bagged the goodies in a cellophane bag and sealed the tops using my Food Saver sealer, but you could just tape the top, too. I adhered the bag topper with double stick tape, punched a hole on the left and added organza ribbon embellishment. Stamps used are from SU! also. It's a very old set but it's my go-to every Autumn. I got this fall effect by using that double ink technique again. I wish I knew the correct technical term for that. Ink the image using the lighter color and then using a darker cat eye tap the edges, then stamp. See the leaf on the left? It's green in the center with red edges.


This leaf on the left is even cooler. I learned it from my SU! rep a while ago. It's called "thumping." Ink the image all over using the lightest color. Here I used a light orange hue. Then using a red ink pen "thump" the image. Hold the pen at the end and tap the image all over rotating it to get random all over coverage. Do the same with a green ink pen and darker orange ink pen. Before stamping the image onto your card stock, "huff" on the image. This sounds weird, I know, but your warm breath moistens the ink so you get a better image stamped. Finally, stamp the inked image onto your card stock. My directions don't make any sense but I don't know all the technical terms for these techniques and I'm not able to explain them without showing it in person so I hope you're able to translate it. But look at how cool this leaf came out. It's really like the falling leaves you find this time of year that have the beautiful yellow, red and brown hues.