Thursday, October 27, 2011

Adventures in Baking Parts I & II

Part I- Ginger Pumpkin Bread
I took a break from crafting to do some baking. I come from a long line of bakers and I think it's just in my blood. Plus I've watched thousands of hours of the Food Network so that automatically makes me a chef, right?
I don't normally bake bread. I usually bake cookies, but this crisp cold fall weather has inspired me to try pumpkin bread. I found this Ginger Pumpkin Bread recipe from www.marthastewart.com. Although the texture and sweetness was excellent, I wasn't crazy about the ginger. I prefer ginger flavor in savory foods like teriyaki chicken and kalbi (korean style ribs,) not so much in sweets. Unless we're talking gingerbread cookies with vanilla frosting. But that's a whole different category. "I never met a cookie I didn't like," is my motto. So pretty much any flavor cookie is good, even the ginger variety.
I tried it out at work and had mixed reviews from "love it" to "so-so." I guess it all depends on your likeness to ginger. My husband liked it, which says alot because he hates anything pumpkin flavored. He doesn't even like pumpkin pie at Thanksgiving!
Unsatisfied with this bread (sorry, Martha) I found another recipe and we move on to Part II:

Part II- Spiced Pumpkin Nut Bread
Do these loaves look unusually mountainous? The recipe called for two 9x5 loaf pans, but I didn't realize that detail until after I threw them in the oven in two 8.5x4.5 loaf pans. I guess it's that whole reading-the-directions-thouroughly thing again that I failed to do.

{Why make large loaf pans only 0.5" larger than the medium loaf pan. I totally get the mini loaf pans. They're miniature sized. They're cute. The large loaf pan just messes up the medium loaf pan recipe and I doubt I will go out and buy large pans. Why not just make one standard size loaf. So irritating. lol.}

This bread was delicious regardless of the overfilling faux pas. It didn't overflow while it baked and it still baked all the way through in the same amount of time as the recipe called for, so I guess it's all good. They'll just be larger toward the middle. The Ginger Pumpkin Bread texture was way more moist and cake-like, which I really liked about Part I, but I much prefer the pumpkin pie spice added to this bread. Maybe I'll try Part I again and sub pumpkin pie spice for the ground ginger. Part III is coming soon. I was going to bake mini loaf Banana Chocolate Chip Bread (recipe from the same source) but I ran out of flour and sugar ingredients. It'll have to wait until my next grocery shopping trip.
Find this Spiced Pumpkin Nut Bread recipe at www.verybestbaking.com/recipes.
Thanks for visiting and Happy Autumn everyone!

Wednesday, October 26, 2011

Happy Halloween!

Last month I went to a Stampin' Up! stamp camp. We made these adorable Halloween candy holders. My variation is a little different than the original, but you get the idea. (Check out those conjoined twin pumpkins on the right!)

Here's a close-up of the ghost detail on the front. Use different shape circles for the eyes to create a "crazy" ghost! Use googly eyes for an even bigger impact.

Close-up of the sentiment on the inside. You can use any lettering to stamp "boo." I added the witch spider stamp for fun.

Materials:
black cardstock
white cardstock
orange cardstock
Stampin' Up! owl builder punch
Stampin' Up! scallop circle punch
Circle cutters
1"x8" cellophane bags
approx 24 M&Ms per bag
craftsmart Halloween stamp
letter stamps to spell out "boo"
black ink stamp pad

Fill cellophane bags with about 24 M&Ms and fold over to seal. Make sure to not fill it all the way to the top. You'll need enough room to create a "tab" that you can tape the tag to. Punch out ghost by using the owl punch onto white cardstock. Cut off the legs and flip it upside down and there's your ghost. Draw on eyes with a black marker. I punched out tiny black circles using the owl punch and glued them on. You could also use googly eyes. Make the black base tag by folding a small piece of black cardstock in half and then punching out circle just off the edge to create a card that opens. Cut a smaller circle on the inside to create a window. (Stampin' Up! makes a circle window die cut that does all this in one step, but I don't own one so I had to improvise.) Punch orange cardstock using scallop circle punch. Stamp "boo" sentiment in the center. Glue ghost onto front of tag. Glue window to orange scallop circle. Tape the tag onto candy bag. Punch black cardstock using scallop circle punch. Line up with tag and tape to back of the candy bag for a finished look. Laura has Stampin' Up! ideas and much more on her blog bytkg.blogspot.com

It sounds like a lot of work, but it went by pretty quickly with my 'lil helpers. They filled the bags with candy while I did all the cutting and punching. My 6 yr old is crafty enough to glue on all the eyes and ghosts. It did get a little messy because those eyes circles are so darn tiny. It was a fun Halloween arts & crafts project for the kids. We had quite the production line going.

Have a safe and Happy Halloween!

Tuesday, October 25, 2011

Baby Onesies

I know this is another sewing entry, but I just had to share these. My dear friend just gave birth and I wanted to give her and baby something original. I got plain white onesies then tie-dyed them in blue and green. I appliqued little felt designs onto the front using contrasting embroidery floss. The Owl Onesie is made using the owl punch from Stampin'Up! I was not able to punch directly onto the felt because of its thickness. I had to just use the design and hand cut each piece out. The eyes are tiny buttons.
For the birds I used Stampin' Up! sizzlet. Again, the felt was too thick to run through the Big Shot Machine. I had to create a template and hand cut each piece.
The "E" monogram I used Basic Grey Bon Bon chipboard as my template.
I like that it's cute but not too girly.
Babies make messes; they can't help themselves. I like the idea that when he wears these, even if he spits up on himself, you won't even tell because it will just blend right in with the tie-dye.
It will help disguise it, right?
Here's the card that I made to go with it. I used the Stamping Up! owl punch. I have to say that when I first saw the punch I was not impressed. I'm not sure how my cousin talked me into getting it, but I'm glad she did. It has grown on me. I use it all the time. It's really fun to build different owls with designer paper. The building punches are a lot of fun in general and I recommend these. She talked me into getting the stocking building punch and I can't wait to start playing with that one....but that's another blog post. Back to the card. I tried to create an atypical boy baby card. They're always powder blue and very cutesy. I used dark green textured paper for the background and dark pumpkin textured paper for the accent border. I stamped letters to the front in green on cream color paper. Constructed the owl and attached the letter E on his heart. The inside sentiment says, "E is for" with his name spelled out.

Monday, October 24, 2011

Skirt

When I was six, my 13 year old cousin would baby sit us kids. She would make clothes for her little sister's Barbie dolls. I don't know if I was amazed that the dolls had such a vast wardrobe, or that my cousin could make such tiny clothes, but I have always been inspired by my cousin and that childhood memory. My mom taught me how to sew when I was twelve. I hate following patterns. I get too impatient. I get lost, just like when I'm on those automated phone menus. I always have to call back because I miss the options from not listening. Anyway, I am able to sew dresses and girl clothes without following a pattern pretty easily. Once you get into arm sleeves, zippers and crotches it gets very complicated. I went to the Fabric Depot last week and saw this cute skirt sample hanging up. I didn't buy the pattern, so I probably got the measurements wrong, but it turned out cute anyway. I had some leftover material and made a matching rose hair clip.
My mom crocheted the sweater. Not sure if it matches the skirt, but I couldn't find a blouse that went with it. Here's a close-up of the cute material. It's got Asian writing and daffodils. The long petticoat is a darker contrast with a design that looks similar to hearts. The ribbon accent is pink & green grosgrain ribbon from Michael's Craft store.
I was able to sew this in one day. I'm not sure if I would have saved time by following the pattern. Yes, I had to figure out all my own measurements, but I didn't have to pin the pattern to the material, cut and then read step by step confusing instructions. I like figuring it all out on my own anyway. It keeps things challenging.

Sunday, October 23, 2011

New Kicks

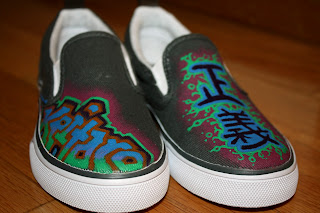
Rember when I was in the 6th grade and I drew all over my pink Converse hi-tops with a black sharpie? Well apparently I should have started marketing them back then because they are so "popular nowdays with the kids." Yeah, I sound old fashioned.
I painted these for my son with fabric paint. Hope they last more than two weeks. Kids go through shoes pretty quickly.