 I had a challenge to make Thank You cards for both male and females. I didn't want to make them too gender specific so I tried to use neutral colors. I made this card using SU! Sale-A-Bration Outlined Occasions Set. I stamped it with three different colors then sewed it onto yellow polka dot card stock. I distressed the edges. I really want to add a flower and some buttons to that bottom right corner. I think it really needs it! Ugh, but I will resist. It would end up looking too feminine and the challenge would be over. Less is more, right?! Sometimes just keeping it simple is a lesson in itself.
Saturday, March 24, 2012
Sew Thankful
I had a challenge to make Thank You cards for both male and females. I didn't want to make them too gender specific so I tried to use neutral colors. I made this card using SU! Sale-A-Bration Outlined Occasions Set. I stamped it with three different colors then sewed it onto yellow polka dot card stock. I distressed the edges. I really want to add a flower and some buttons to that bottom right corner. I think it really needs it! Ugh, but I will resist. It would end up looking too feminine and the challenge would be over. Less is more, right?! Sometimes just keeping it simple is a lesson in itself.Wednesday, March 21, 2012
Simple Thank You

Here is a better example of that background technique I tried on Monday. (See last post) I like how the background turned out on this one much better than the Thank You Yoshimi card. It turned out all messy and distressed. Here's a tip: Don't go crazy with the sandpaper. Your paper will become too thin and fall apart.
Monday, March 19, 2012
Yoshimi Thank You

I made this card kind of purple so it wouldn't be TOO pink. I saw on another blog that you could run your paper through an embossing folder, run a waxy crayon over the design and it would resist when you inked over that. In theory it sounded like a brilliant idea. Well, I must not have read the instructions or did something wrong, because it didn't come out like I thought it would.
Here's what I did: I ran white paper through embossing folder. I kept the paper on the design to keep it stable and I rubbed a white crayon over the raised (embossed) areas. Then I used a sponge to apply purple, pink and rose ink to the white paper. I rubbed it in a circular motion with medium-light pressure. The wax on the raised parts took the color rather well. I tried to rub it off with a clean paper towel, but without much success. I rubbed the white crayon over the raised design again thinking that it would make it white, but that didn't work either. So, I ended up lightly sanding it with fine sand paper. I tried the same technique with a white pastel crayon too thinking it would be more waxy. Maybe I wasn't using the right type of ink? The background didn't come out too bad and I had fun experimenting. I guess I have to search the internet and try to find that original link.
I stamped Thank You sentiment in Chinese up in the top left. I made a little fan embellishment using origami paper and gold thread. I cut the origami paper using the same Spellbinder Nestibillities as the other two frames. Cut it in half, fold accordion style and snip the bottom corner off. Wrap the bottom with gold thread and spread top and bottom out fan-like. Secure to card with tacky glue.
Happy Spring!
Monday, March 12, 2012
Many Thanks Owl Card
 |
| SU! punches & matching stamp sets make this an incredibly easy card |
I love that I didn't have to color anything in. It was just stamp, punch and glue. This makes for an easy project when you have many multiple cards you have to make.
Hopefully this is the last owl card you'll see from me. Though they are adorable, I am growing tired of the owl trend.
Tuesday, March 6, 2012
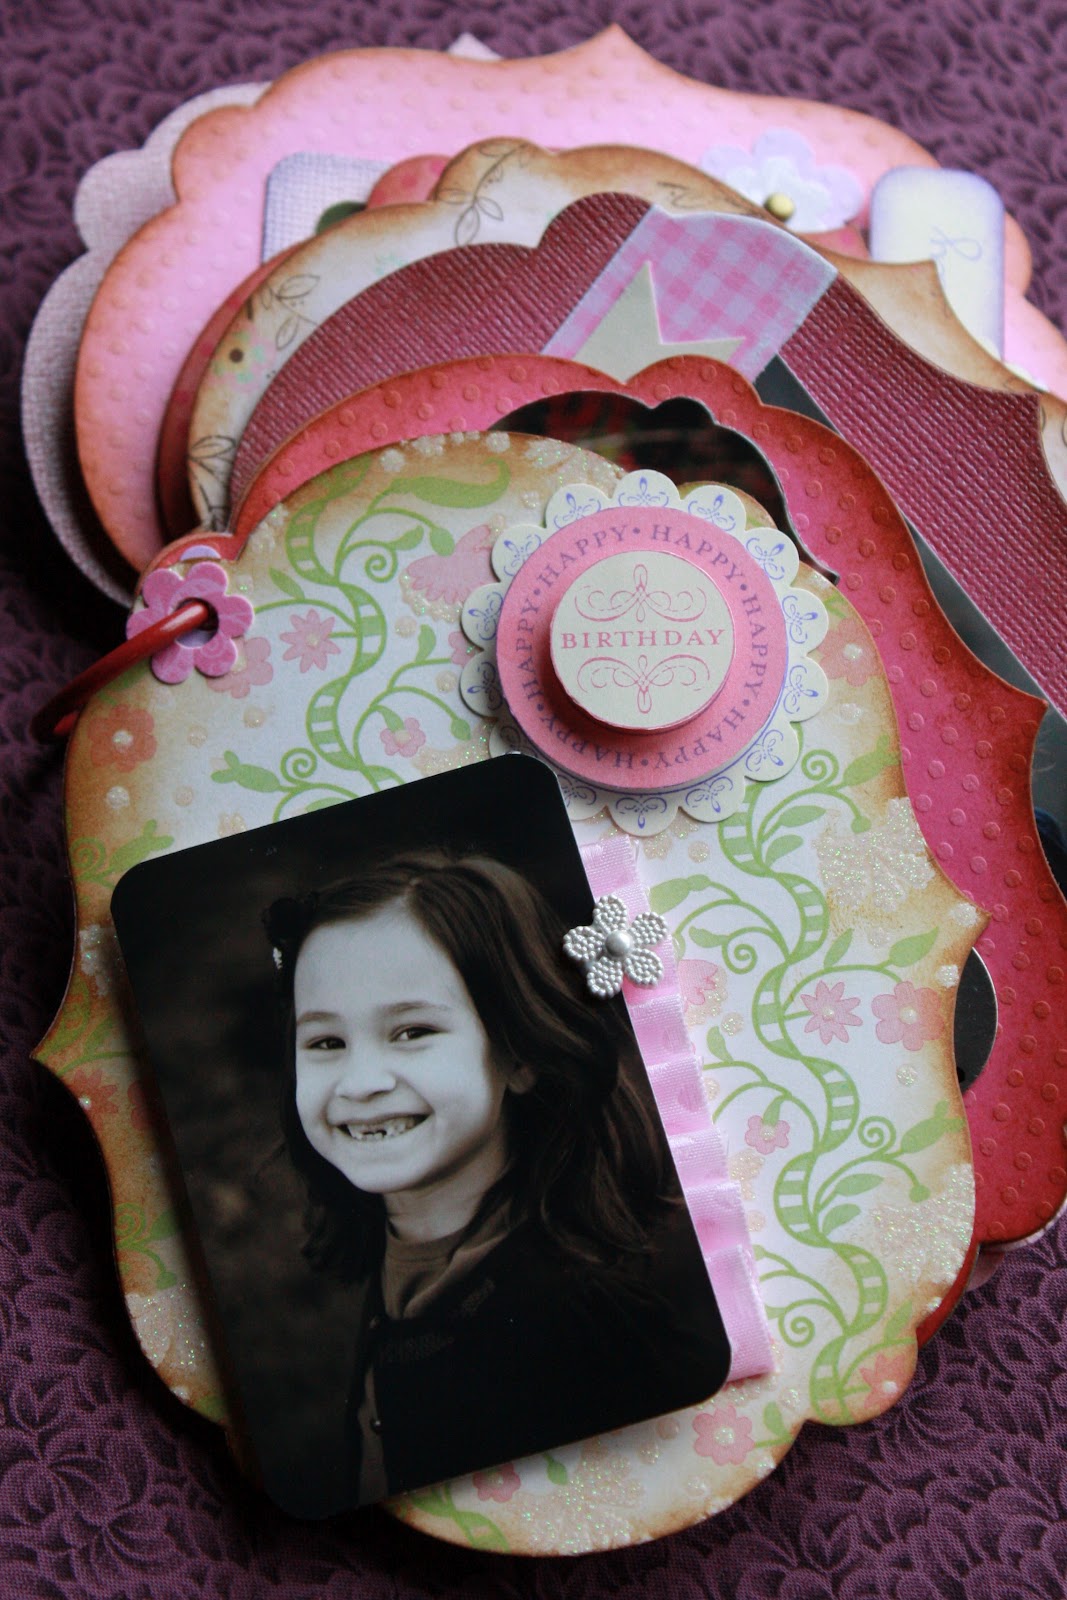
Birthday Mini Album
 I'm really excited about this project. Instead of making my children birthday cards I decided to make them mini albums. I wanted to create a keepsake they can look back on when they are my age. Or even better, their children can look at when they are this age.
What I'm really excited about is this new SU! Framelits. They are adorable. I'm so in love with them! I edged everything with antique ink to give it that vintage look. This being a child-friendly album, I don't have to worry about them getting it dirty, it already looks worn.

My daughter got really bored during our photo shoot so she began dancing and twirling around. What a great opportunity! I captured some shots of her dancing and decided to make a film strip. I love this idea because sometimes those posed shots get so stagnant. Doing this really shows her fun and vibrant personality.

The only challenge was how to put it in this weird shaped album. I decided to accordian fold it and secure it with a latch. I made this from ribbon, buttons and embroidery floss.

Some of the questions from the interview were favorite food, favorite toy, favorite school subject, music, video game and favorite color (can you guess it was pink?) Some other things I included were the meaning and origin of her name, what is so special about the day she was born, both her Eastern and Western birth signs and their traits....well you get the picture.


I'm not sure about this color combination, but I got so sick of pink. I definitely raised a princess.....Everything is pink with pink glitter and pink bling with a pink cherry on top! For this page, I added blue with black flowers. It sure is different, but I think it works. I added a bit of glitter to the flower centers.
I hope this inspires you as you have all inspired me. Thank you for stopping by!
Subscribe to:
Posts (Atom)